|
gumoil
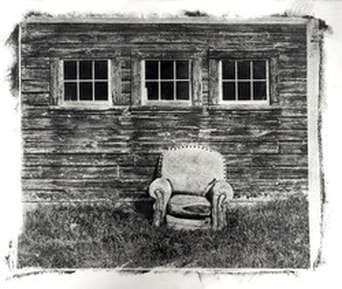 "Old Chair" (gumoil) Terri Cappucci "Old Chair" (gumoil) Terri Cappucci The Gumoil Process What is the Gumoil process? It is a photographic printing process that uses a sensitizing gum arabic mix and oil paint, to create a handmade photograph. It is more detailed than this, but it is a start when explaining to someone for the first time. I enjoy this tactile process known as Gumoil, for a few reasons. In the age of technology, photographs have become so easy to come by and are very uniform. They are either in a digital format on a screen, or the photographer has the ability of making multiple prints on a home printer. It is so easy for anyone with a camera to have unlimited photographs printed. Unless a particular process is involved, they are all done the same way and none are unique to each other. In my own photographic work, I find that I want and need something different. If I do not have my hands involved in the process, it will not feel like my creation. From the lens to the final print, my hands need to be as involved as my vision. With that said, I do work with digital on occasion, but I am really a film and alternative process photographer. Gumoil is very challenging and can frustrate from time to time, but that is the part that makes the results personal to me. The outcome will never be the same in any two prints. It makes the work one of a kind and each print, unique. After seeing some of my recent prints, Anna Ostanina (a fellow artist who was instrumental in my learning this process) said to me, “Terri, you have your own handwriting style in this process”. Those words really summed up what I had been looking for explain what I wanted to express in my art. I want my work to have my own thumbprint in and on it. A little history that I found online about the gumoil process. It was invented by Karl P. Koenig (1938-2012), in 1990. He originally called it “ Polychromatic Gumoil Photography”. Since this time, other photographic artists have taken his process and continued to explore, leading to multiple workflows and methods to get similar and even better, results. Koenig tends to remove his paint with more of a rubbing process. His book “Gumoil Photographic Printing” is no longer available, but it can be found used. I also came across Anna Ostanina’s work. She removes the paint with less rubbing and more water. It appeared easy when I saw her images and videos, but after speaking with and learning from her, it was not that easy. She had researched and tested the right combinations of paint, paper and steps, that would give her the paint removal process and final print results that she was seeking. She is a master of her craft and a gracious teacher. When I make my gumoil prints, I am using a combination of workflows that I learned from both Karl Koeing and Anna Ostanina. With that in mind, my supplies and mixtures may be different. Here is a list of what you need along with the image you want to use: *** Please be cautious using Potassium Dichromate. Do not inhale or get on your skin. Always wear gloves and a respirator face mask when working with this chemical. ***
Once dried, I take the paper out and put the inter-positive that I made of my image, on top of the now dried, sensitized area. I then expose it to the UV light. Exposure times will vary depending on the suns strength if you do it outside, or the kind of exposure unit you are using. I use a Nuarc exposure unit and exposure time is between 3-4 minutes. After being exposed, you will see the details of your image. As soon as it done exposing, soak the paper in water immediately. This is the developing process. This will stop the exposure and remove the rest of the yellow sensitizer. I soak for 15-30 minutes. This is a delicate part of the process as the gum swells on the paper and needs to be left to dry without being wiped or touched. It holds the part of your image with details and can remove or distort your image if it is wiped off while still wet. Take the print out of the water and dry your image. I use a drying rack I made or just hand on a clothes line. If you dry outside, be careful with wind. I have had little particles and bugs that have stuck to the gum. Once the print is completely dry, apply the oil paint. I don’t apply it thick because it is messy when it comes off. If you do add too much paint, try to smooth it out with a soft cloth or a quality paper towel. I use Viva paper towels because they don’t leave a lot of “fuzz” behind. The shadow areas will begin to show through the oil paint. This is when the print can be placed in water and gently removed with a sponge. Be gentle or you can wipe off the image, take off too much paint or damage the paper. There is another part of this process called “etching” where a bleach and water mix will allow a 10-15 second etch bath and then repeat the process of soaking, drying, applying paint and rinse and remove paint with a. soft sponge again. I don’t always etch my prints, but I will if I want to more detail in my image. A few things I have learned that have made a big difference in the success of my gumoil workflow. When I get the results I am pleased with, it will be in part because of a combination of water source, paint brand and quality and the water color paper being used. Sometimes there is a different combination of paint brands and paper that work, depending where I am. I have found that in my studio, one combination of paper and paint will work better with the water. If I am in a different location, I may have completely different results and have to use a different paint and paper combination. I am not sure why, but my theory is that it has to do with the water treatment in different cities and the water reaction to the entire mix of sensitizer and paint, depending on the location where the print is being created. Other gumoil artists may do things differently. After talking with others who make gumoil prints and trying many different techniques, papers, paints, exposure times, and steps, I have developed a workflow that gives me as close as I can get to having consistent results. With that in mind, it can change very quickly because this is still an unstable process. With that said, I am seeing more consistency with the new mix of paper and paint that I have been using. Here are a few videos I have made of my process:
Christopher James book “Alternative Photographic Processes” is another resource that offers some information on this process. So many artists that inspire me and I learn from…..Thank you all. *Acknowledgement: Karl Koeing, Anna Ostanina, Diana Bloomfield, Kelly Wrage, Daniel Zilbersheid, Quinn Jacobson, Laurie White Updated: February 19, 2018 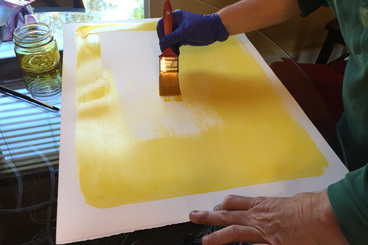 Applying sensitizer (gum/PD mix) 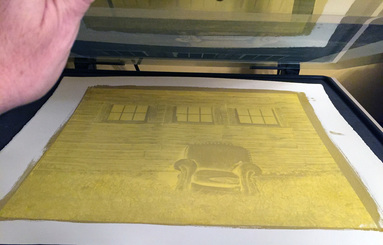 After exposure through the inter-positive 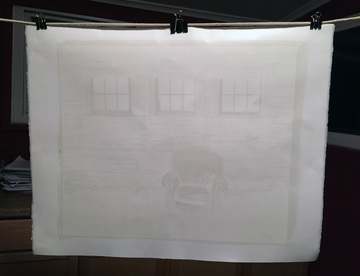 After soaking and drying just prior to applying paint 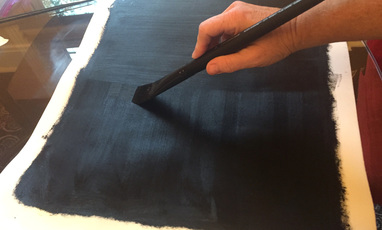 Applying oil paint
8 Comments
Sylvie vey
12/15/2016 04:02:19 am
hello! Thanks for sharing your own experience. I tried this process a fiew months ago, but I noticed that oil paint is drying very fast and it stays on my paper....it seems to go away with your sponge gently doing it.... very nice work! ;-)
Terri Cappucci
12/20/2016 10:53:02 am
Thank you. :)
Robin Gauld
12/15/2016 07:59:24 pm
Thank you so much for the blog. Earlier this year I tried this process. After quite some effort I was getting poor results. I was following instructions that used the bleaching method.
Terri Cappucci
12/20/2016 10:52:27 am
Hi Robin, Yes, I have used Windsor Newton gum arabic. I do like it. There are many other's out there as well. I know the crystals seem to be to many people's liking. Drying time: well, after oil paint is applied, I wait until I see the shadow areas appearing within the paint, and then I give it another 5 min or so before wiping. I don't like waiting a long time. IF you find it dries fast, then I would just wet it then... Im glad you found this helpful. :)
brian bussard
5/15/2017 11:31:47 am
do you suggest adding pigment to the black oil paint
Terri
7/1/2017 05:50:19 pm
Hi Brian, I think it is all experimental and depends on the black you are using (ie. lamp black, ivory black, etc.). Lamp black is pretty dark but I have been experimenting with my own pigments and oils lately. I would try because you may come up with something fantastic. This is how new techniques emerge. Good luck and let me know how it works. Terri
Chris Hoult
2/12/2018 04:17:39 pm
Hi Terri, like you I have been an exponent of gumoils printing for some years now, ( I acquired Karl’s book after learning that Kodak were removing themselves from the black and white market ), also like you I am predisposed towards a hands on approach towards photography, I have built myself a darkroom which gets a regular workout! I use the sun for my exposure and while I like the variations that this uncontrollable light source gives me I am not enamoured with being at the mercy of the vagaries of the weather, I would like to produce prints when the sun is hiding! Can you give me details of your UV light source, did you buy it or make it yourself? Wattage of bulbs etc. Any help would be greatly appreciated. Regards Chris
Christian
4/10/2018 08:55:58 am
Hi Terri, Leave a Reply. |
Thoughts in Print"If you don't want something seen, control how much exposure you give it." tc categories |
 RSS Feed